1
| |
_config.yml
gemfile
gemfile.lock
一些问题看手机图片,在空间
1
| |
_config.yml
gemfile
gemfile.lock
一些问题看手机图片,在空间
原博内容:
rvm安装低版本ruby报错Error running ‘requirements_debian_libs_install libssl1.0-dev’,Requirements installation failed with status: 100.
由于参与的一个项目在用2.3.1版本的ruby,所以想用rvm来安装ruby2.3.1。运行报错,需要libssl1.0-dev.
解决办法:
1
| |
在/etc/apt/sources.list 中添加下载源 deb http://security.ubuntu.com/ubuntu bionic-security main。保存退出。
1
| |
1
| |
然后再安装rvm install 2.2.6
————————————————
版权声明:本文为CSDN博主「会打滚的咸鱼」的原创文章,遵循CC 4.0 BY-SA版权协议,转载请附上原文出处链接及本声明。
原文链接:https://blog.csdn.net/qq_41988167/article/details/106202868
很多以前做过的事,细节步骤都不记得了,多写字吧,详细地记录下来,以后也有个回忆。
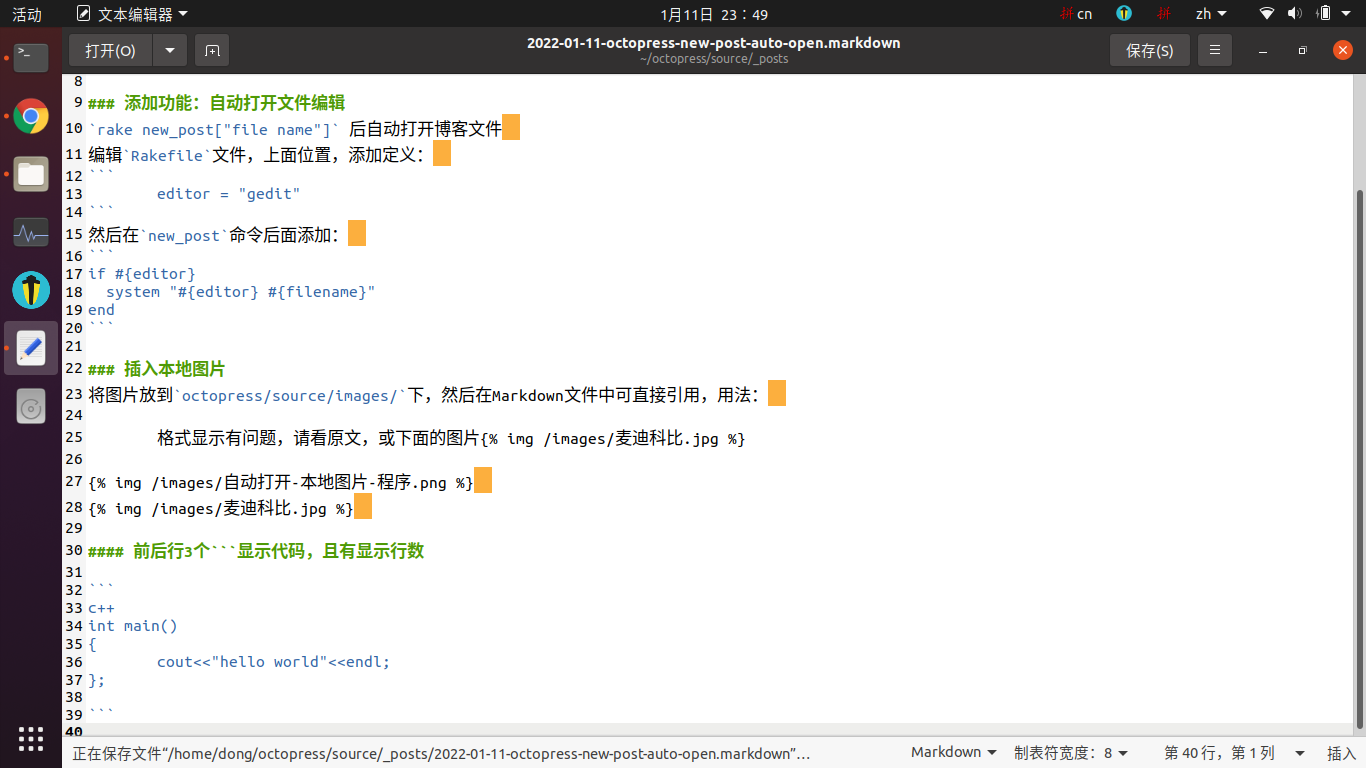
rake new_post["file name"] 后自动打开博客文件
编辑Rakefile文件,上面位置,添加定义:
1
| |
然后在new_post命令后面添加:
1 2 3 | |
将图片放到octopress/source/images/下,然后在Markdown文件中可直接引用,用法:


1 2 3 4 5 | |
rvm install 2.3.1
失败
.
cd octopress
.
ruby --version
.
rvm use 2.7.0
Required ruby-2.7.0 is not installed.
To install do: 'rvm install "ruby-2.7.0"'
.
dong@Ubuntu:~/octopress$ rvm install "ruby-2.7.0"
.
dong@Ubuntu:~/octopress$ ruby --version
ruby 2.7.0p0 (2019-12-25 revision 647ee6f091) [x86_64-linux]
.
dong@Ubuntu:~/octopress$ rake generate
Could not find rake-10.5.0 in any of the sources
Run `bundle install` to install missing gems.
.
dong@Ubuntu:~/octopress$ bundle install
Traceback (most recent call last):
4: from /home/dong/.rvm/rubies/ruby-2.7.0/bin/ruby_executable_hooks:22:in `<main>'
3: from /home/dong/.rvm/rubies/ruby-2.7.0/bin/ruby_executable_hooks:22:in `eval'
2: from /home/dong/.rvm/rubies/ruby-2.7.0/bin/bundle:23:in `<main>'
1: from /home/dong/.rvm/rubies/ruby-2.7.0/lib/ruby/2.7.0/rubygems.rb:294:in `activate_bin_path'
/home/dong/.rvm/rubies/ruby-2.7.0/lib/ruby/2.7.0/rubygems.rb:275:in `find_spec_for_exe': Could not find 'bundler' (1.17.3) required by your /home/dong/octopress/Gemfile.lock. (Gem::GemNotFoundException)
To update to the latest version installed on your system, run `bundle update --bundler`.
To install the missing version, run `gem install bundler:1.17.3`
.
dong@Ubuntu:~/octopress$ gem install bundler:1.17.3
Fetching bundler-1.17.3.gem
Successfully installed bundler-1.17.3
Parsing documentation for bundler-1.17.3
Installing ri documentation for bundler-1.17.3
Done installing documentation for bundler after 3 seconds
1 gem installed
.
dong@Ubuntu:~/octopress$ rake generate
Could not find rake-10.5.0 in any of the sources
Run `bundle install` to install missing gems.
.
dong@Ubuntu:~/octopress$ bundle install
.
dong@Ubuntu:~/octopress$ rake generate
rake aborted!
Gem::LoadError: You have already activated rake 13.0.1, but your Gemfile requires rake 10.5.0. Prepending `bundle exec` to your command may solve this.
/home/dong/octopress/Rakefile:2:in `<top (required)>'
(See full trace by running task with --trace)
提示失败,
但是可以加上bundle exec
dong@Ubuntu:~/octopress$bundle exec rake generate
很多警告,但是成了,
下面也一样:
bundle exec rake preview
首先利用rfkill命令查看目前无线传输设备的状态,rfkill是一个命令行工具,可使用它查询和更改系统中启用了RFKill的设备。
rfkill的常用方法为:
rfkill list all
#  获得设备列表

rfkill block [index|type]
#  通过索引或类型禁用设备

rfkill unblock [index|type]
#  通过索引或类型启用设备
当前设备状态如下:
rfkill list all
输出:
0: phy0: Wireless LAN
    Soft blocked: no
    Hard blocked: yes
1: acer-wireless: Wireless LAN
    Soft blocked: no
    Hard blocked: no
通过rfkill启用/禁用设备无法对硬件阻塞产生作用。
由于笔记本只有一个无线网卡,这两个模块应该是有冲突
使用命令lsmod | grep acer可以看出系统启动了acer_wmi模块
通过查找资料后,解决方法为禁用acer_wmi模块。
解决方法:
通过在/etc/modprobe.d/文件夹下,编辑blacklist.conf文件,最后一行添加内容: blacklist acer_wmi
sudo gedit /etc/modprobe.d/blacklist.conf
重启
wifi自动为打开状态,此时rfkill list all命令结果如下:
rfkill list all

0: phy0: Wireless LAN
Soft blocked: no
Hard blocked: no
版权声明:本文为CSDN博主「Monkey_D_Shuai」的原创文章,遵循CC 4.0 BY-SA版权协议,转载请附上原文出处链接及本声明。 原文链接:https://blog.csdn.net/ls12165/article/details/68189943
ubuntu20.04安装了几次2.0都失败
ubuntu12.04已经无法安装系统本身的更新了,更别说安装其他软件
强迫症发作,于是有了这次:
category_list 插件在 octopress\plugins\ 文件夹里面,新建一个文件,名为:category_list_tag.rb。并将下面的代码粘贴到里面。
module Jekyll
  class CategoryListTag < Liquid::Tag
    def render(context)
      html = ""
      categories = context.registers[:site].categories.keys
      categories.sort.each do |category|
        posts_in_category = context.registers[:site].categories[category].size
       category_dir = context.registers[:site].config['category_dir']
        category_url = File.join(category_dir, category.gsub(/_|\P{Word}/, '-').gsub(/-{2,}/, '-').downcase)
        html << "<li class='category'><a href='/#{category_url}/'>#{category} (#{posts_in_category})</a></li>\n"
      end
      html
    end
  end
end

Liquid::Template.register_tag('category_list', Jekyll::CategoryListTag)
这个插件会向liquid注册一个名为category_list的tag,该tag就是以li的形式将站点所有的category组织起来。如果要将category加入到侧边导航栏,需要增加一个aside。
aside在 octopress\source\_includes\asides\ 文件夹里面,新建一个文件,名为:category_list.html 。并粘贴下面的代码:
注意: 去掉 % 前面的2个 \
这里如果不加上\,markdown格式会显示category_list的内容。我是为了正确显示代码才加上的
<section>
  <h1>Categories</h1>
  <ul id="categories">
    {\% category_list \%}
  </ul>
</section>
_config.yml 文件 ,修改 default_asides打开 octopress\_config.yml 文件,修改里面的 default_asides 这一行,将 asides/category_list.html 添加进去。
default_asides: [asides/category_list.html, ......]
这里可以修改侧边栏的顺序
代码如下:
dong@Ubuntu:~/octopress$ git push origin source

ERROR: Repository not found.
fatal: Could not read from remote repository.

Please make sure you have the correct access rights and the repository exists.
打开文件~/octopress/.git/config,查看
[remote "origin"]
    url = git@github.com:haydnyau/haydnyau.github.io.git
我是改了几次,com.git和io.git搞错了